Some people choose to turn on read receipts (also known as return receipts) in their e-mails. This means that when someone opens your e-mail, they will be given the choice to send a message (read receipt) to you to confirm that your e-mail has arrived.
To turn on read receipts in Roundcube webmail, follow these steps:
- Log into your webmail account by visiting webmail.your-web-site-address.co.uk - replacing your-web-site-address.co.uk with your web site's address
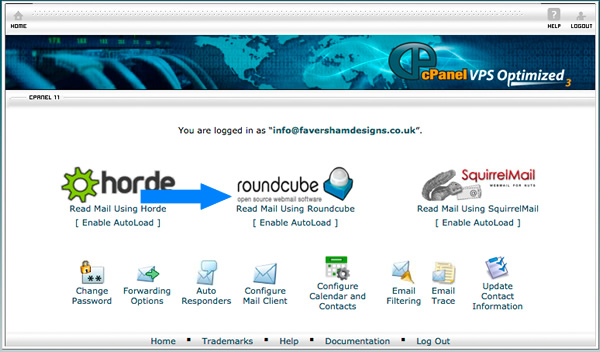
- Once logged in, click on the 'Roundcube' icon to enter the Roundcube e-mail system

- Once the page has refreshed, click on the 'Settings' icon in the top-right hand corner
- In the middle of the page, click on 'Composing Messages'

- Now tick the 'Always request a return receipt' box and then click on the 'Save' button at the bottom of the page.
Read receipts will now be turned on. It's a good idea to test this by sending an e-mail to another one of your e-mail accounts to see if the changes have worked for you.
If you use our webmail service you can set an autoresponder for your e-mail accounts.
An autoresponder is a message that is sent, automatically, to someone when they e-mail you. The most common use of these is 'out of office' messages, which people often set when they go on holiday.
To set-up your own autoresponder, just follow these steps:
- Log into your e-mail account by visiting webmail.your-web-site-address.co.uk
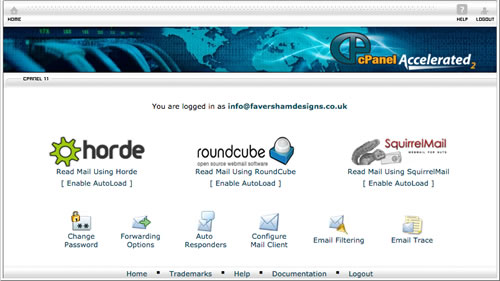
- The screen below will be displayed. If it isn't or if it is shown only for a second, click the back button on your internet browser

- Click on the 'Auto Responders' icon at the bottom of the screen
- A new page will be displayed. Click on the 'Add Auto Responder' button at the top of the page
- Enter '1' in the 'Interval' box. Then enter an e-mail subject in the 'Subject' box and finally enter your autoresponder messsage in the 'Body' text box
- If you want to, you can also specify when you would like the autoresponder message to start and stop. For example, if you are going away for a week, you can set the message to only send during the time that you are away and it will stop automatically when you return
- Finally, click on the 'Create/Modify' button at the bottom of the page. Your autoresponder message is now active.
To add your e-mail account to the Apple Mail program, follow these steps:
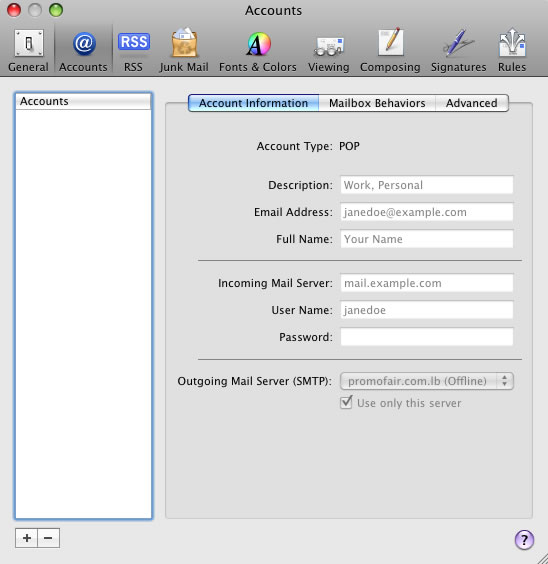
- Launch Apple Mail and when loaded, click on 'Mail' from the menu and then click on 'Preferences'
- Click on the 'Accounts tab' at the top of the window and then click on the + button at the bottom left part of the window

- On this screen you need to enter your name, e-mail address and password. In the 'Full Name' box enter the name that you would like to appear on someone's screen when they receive an e-mail from you. This could be your name or your business name. Once complete, click on the 'Continue' button
- The next screen is the 'Incoming Mail Server' screen. Enter the following information:
- 'Account Type' - select 'IMAP' from the drop-down box
- 'Description' - enter your e-mail address
- 'Incoming Mail Server' - type in mail.your-domain.co.uk, replacing your-domain.co.uk with your web site address (remember, do not enter the www. part of your web site address)
- 'Username' - enter your e-mail address
- 'Password' - enter the password for your e-mail account
- Once all of the information has been entered, click on the 'Continue' button
- The next screen is the 'Outgoing Mail Server' screen. Enter the following information:
- 'Description' - enter your e-mail address
- 'Outgoing Mail Server' - enter mail.your-domain.co.uk, replacing your-domain.co.uk with your web site address (remember, do not enter the www. part of your web site address)
- Tick the 'Use Authentication' box and enter:
- 'Username' - enter your e-mail address
- 'Password' - enter the password for your e-mail account
- Now click on the 'Continue' button
- On the 'Account Summary' screen, ensure that the 'Take Account Online' box is ticked and then click on 'Create'
- The account will now be added and you should be able to send and receive e-mails immediately. To test that everything is working as expected, we recommend that you send yourself an e-mail and make sure that it is received.
To set-up your e-mail account on a Sony Experia phone, just follow these steps:
- Open the Applications list
- Tap Email
- Enter your email address
- Enter your password
- Tap Manual setup
- Select 'IMAP' as your account type and then enter the following details:
-
Username: your e-mail address
-
Password: your e-mail password
-
Server Details: mail.your-web-site-address.co.uk - replacing 'your-web-site-address.co.uk' with your own web site address, without the 'www' bit
-
Port: 993
-
Security type: None
-
Tap Next
-
The handset will check incoming settings before proceeding.
-
This article describes how you can set up your iPhone to access your e-mail account.
- On your iPhone tap the 'Settings' icon
- Tap on 'Mail, Contacts, Calendars'
- Tap 'Add Account'
- A list of e-mail providers is displayed. Scroll to the bottom and tap 'Other'
- Tap on 'Add Mail Account'
- In the 'Name' field, enter your name. This will be displayed to users in the 'From' field when they receive messages from you so you may want to enter your name or your company's name
- Enter your e-mail address in the 'Email' field
- Enter your e-mail password in the 'Password' field
- In the 'Description' field, enter a name for the account such as 'Personal' or 'Work', for example
- Now click on 'Next'
- A new page will be displayed. Ensure that 'IMAP' is selected at the top of the page.
- In the 'Host Name' field, enter mail.yourwebsite.co.uk, replacing 'yourwebsite.co.uk' with your web site address. Note, do not enter 'www.'
- Enter your e-mail address in the 'Username' field
- Enter your e-mail password in the 'Password' field
- Scroll down and enter the same details in the 'Host Name', 'Username' and 'Password' fields under the 'Outgoing Mail Server' header
- Click on 'Next'
- A new screen will appear. Click on 'Save'
- Your new account should now be added. Go back to the Home Screen, tap the mail icon and any messages that you have should now download
- To test, try sending an e-mail to yourself to ensure that it sends and then it received.
Final Set Up
Your new e-mail account is now set up however, you can configure it to make things even better!
With your phone set up as it is, when you delete a message from your phone, it will go to the 'Deleted Items' folder on your phone but not on your webmail account. This is also true when you send an e-mail. If you send an e-mail from your iPhone, you will not see it in the 'Sent' folder on your webmail. These folders are not in sync. This may not be a problem for you, it depends on how you use your webmail and iPhone mail. However, if you would like everything to sync, follow these steps:
- On your iPhone tap the 'Settings' icon
- Tap on 'Mail, Contacts, Calendars'
- Tap on the account that you have just set up
- At the top of the next screen, click on 'Acount'
- On the 'Account' page, scroll to the bottom and click on 'Advanced'
- You will now see the 'Mailbox Behaviours' header
- Click on 'Draft Mailbox'. You will see that by default the 'Drafts' folder on your iPhone is selected. Scroll down the list of folders under the 'On The Server' header and click on the 'Drafts' folder
- Now click on 'Advanced' at the top of the screen. This will take you back a screen
- Now click on the 'Sent Mailbox' area
- Do the same as before, scroll down the list and click on the 'Sent' folder under 'On The Server'
- Now click on 'Advanced' at the top of the screen. This will take you back a screen
- Now click on 'Deleted Mailbox'
- Do the same as before, scroll down the list and click on the 'Trash' folder under 'On The Server'
- Now click on 'Advanced' at the top of the screen. This will take you back a screen
- Finally, scroll down until you see the 'Deleted Messages' header. Click on 'Remove' and change the setting to 'Never'
- You are now done. Test by sending a message from your iPhone, to yourself. Log on to a computer and see if you see the message. Delete the message from your iPhone and then, back on the computer, check the 'Trash' folder in your webmail to see if the message has moved
- Done!
To add you e-mail account to Outlook 2013, follow the steps below. If you get stuck, just e-mail us and we'll give you a hand.
- Open Outlook and click on the 'File' button in the top-left hand corner
- The 'Info' page should now show. Click on the 'Add Account' button
- Select 'Manual setup or additional server types' and click 'Next'
- Select 'POP or IMAP' and click 'Next'
- Enter your name. Whatever you type here is the name that will appears on someone's screen when you e-mail them. Now enter your full e-mail address e.g. info@favershamdesigns.co.uk
Select 'IMAP' as your account type. For Incoming mail server (IMAP), enter mail.yourdomain.co.uk replacing yourdomain.co.uk with your web site address.For 'Outgoing mail server (SMTP)', enter the same again - mail.yourdomain.co.uk
In 'Logon Information' enter your e-mail address and the password.
Now click on 'More Settings' - Click on the 'Outgoing Server' tab and tick 'My outgoing server (SMTP) requires authentication'
- Click on the 'OK' button to close the window
- Click on the 'Next' button and your account details should now be verified. Once complete, click on the 'Finish' button and you should now be ready to use your account.
To set up your e-mail account on a Samsung 5 phone, just follow these steps:
- From the home screen, touch the menu button then go to 'Settings' | 'Accounts' | 'Add Account' | 'E-mail' | 'Others'
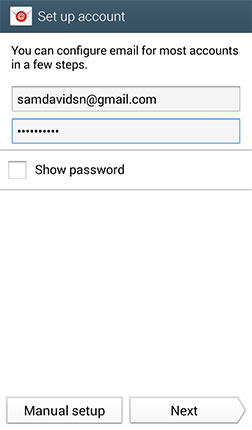
- Enter your full e-mail address and password

- Now click on the 'Manual setup' button
- On the next screen, select 'IMAP account'
- On the next screen, enter the IMAP server address as mail.your-domain-name.co.uk replacing the 'your-domain-name.co.uk' part with your web site address
- Now click on the 'Next' button and your account will be created.
This article shows you how to add a signature to your e-mail account, when using the Squirrel Mail webmail system.
- Log into your webmail account as normal
- In the top-right hand corner of the screen is a cog icon. Click on this to change the settings of your e-mail account
- Once you have clicked on the cog icon, a new page will load. Click on 'Identities' from the left-hand column
- Now click on your e-mail account in the middle column
- The details of your account will now be displayed in the right-hand column. To add a signature, click on the 'HTML Signature' tick box and then enter your signature in the 'Signature' box
- Once finished, click on the 'Save' button. Now click on the envelope icon at the top of the screen, to return to your e-mail account
- Send yourself an e-mail and test that your new signature is working.
When using our webmail system, you have the choice of loading one of three different e-mail clients. If you have decided to use the Horde e-mail system, follow these steps to add an e-mail signature:
- Log into your webmail. When it has loaded, move your mouse over the cog icon and from the drop-down menu select 'Preferences' | 'Mail'
- Click on the 'Personal Information' link
- You can now enter your e-mail signature in one of two places. You can enter a simple text signature in the 'Your Signature' box. Alternatively, you can enter your signature in the box below and edit it to include different font sizes, colours, bold, italics and links.
If you have any problems with this, please e-mail us: support@favershamdesigns.co.uk

